How to Grow Guava Trees from Guava Leaves
Guava trees (Psidium guajava) are known for their delicious fruit and are grown in tropical and subtropical regions around the world. While guava trees are commonly propagated from seeds, cuttings, or air layers, it is possible to grow guava trees from guava leaves. While it may not be the most common method, it can be an interesting experiment for gardening enthusiasts. This article will walk you through the steps to grow guava trees from guava leaves.
Materials you will need:
- Healthy guava leaves from a mature guava tree.
- A clean, sharp knife or scissors.
- Rooting hormone (optional).
- A pot with well-draining soil or a germination tray.
- Plastic bags or cling film.
- A warm, bright place with indirect sunlight.
Step by Step Guide:
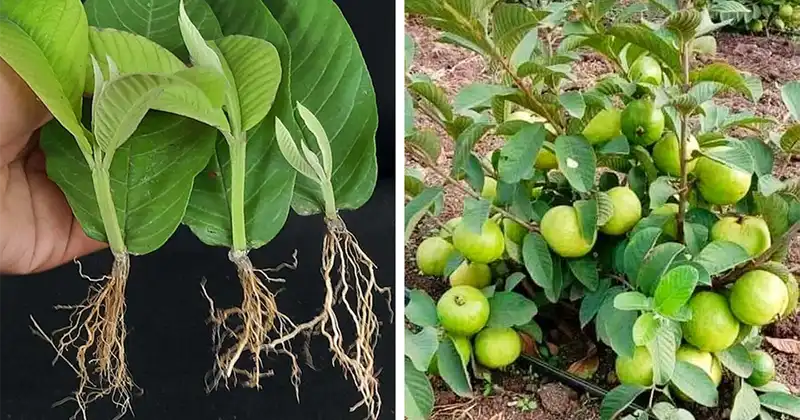
- Selecting Leaves: Start by selecting healthy, mature leaves from a healthy guava tree. It is essential to choose leaves that are free of pests and diseases, as this can affect the success of leaf propagation.
- Cutting the Leaves: Using a clean, sharp knife or scissors, cut the guava leaves into sections, making sure each section includes a portion of the main vein. Each cutting should be approximately 4-6 inches long. If you have access to several healthy leaves, consider taking multiple cuttings to increase your chances of success.
- Rooting Hormones (Optional): Although not required, the use of a rooting hormone can improve the chances of successful root development. If you decide to use a rooting hormone, dip the cut end of each leaf cutting into the hormone following the manufacturer’s instructions.
- Planting: Plant the prepared leaf cuttings in a pot with well-draining soil. You can plant them horizontally with the cut end partially buried in the soil. Plant several cuttings in the same pot or tray, spacing them a few inches apart.
- Wrap in Plastic: Cover the pot or germination tray with a clear plastic bag or cling film to create a greenhouse effect. This will help maintain moisture around the leaf cuttings, which can aid in aeration.
- Provide Adequate Care : Place the pot or tray in a warm location with bright but indirect sunlight. Maintain consistent moisture in the soil by lightly spraying the cuttings or watering them as needed. The soil should remain consistently moist but not soggy.
- Patience: Root development can take time, from several weeks to several months. Be patient and continue to care for the cuts during this time. Check the humidity level inside the plastic wrap, as it should remain relatively high.
- Transplanting: Once the leaf cuttings have developed a healthy root system and grown into small plants, they can be transplanted into larger pots or directly into your garden. Make sure they receive adequate sunlight and water as they continue to grow.
Advice and Considerations:
- Not all guava leaves will successfully root and develop into new trees using this method. The success rate may vary.
- Some guava varieties may be better suited to leaf propagation than others. You may need to experiment to determine the best results.
- Be careful not to overwater leaf cuttings, as excess moisture can lead to rotting.
- Maintain a warm, moist environment for leaf cuttings during the rooting phase to aid in successful propagation.
In conclusion, although growing guava trees from guava leaves can be an interesting and educational gardening project, it is essential to be patient and aware that success is not guaranteed. For a higher success rate and more predictable results, many gardeners prefer to propagate guava trees from seeds or cuttings. However, with the right care and attention, you may be able to enjoy the satisfaction of growing a guava tree from a leaf cutting.